Sunday, September 16, 2012

Adventures in moving.

So life has been a bit busy. We successfully made the move to Wyoming, despite not knowing where we would be living when we got there. A nice couple in town had us stay in their spare room for a couple days, but there was some stress about this, as none of the rental agencies we'd looked at had a move-in date before the 15th of August. Since we got to town on the 5th, this was worrisome. And there weren't a lot of apartments left, as school began on the 27th, and many students had already moved to town. But we made the move anyway, hoping the apartment situation would work out.


We drove through Portland one last time. This picture was the reason we missed our exit; I was too busy taking the photo, and forgot to point out exit 300 (which is the only exit in Portland that I definitely know how to get to, as it is the exit to OMSI where I volunteered for a while this year). We sorted out the debacle, and eventually got to I-84, with only an extra 20 minutes added to the trip. 


Starvation Creek in the Columbia Gorge. It is very pretty, and makes a nice rest stop.


I really liked the root structures.


Somewhere around here, used to be Celilo falls. This and other important fishing sites used by Oregon and Washington tribes were submerged in the 50's by the dams being built at the time, which had been a center of trading to these tribes for thousands of years. Which, well, is depressing, but I think it is important to remember what was lost when things like hydroelectric power from the dams were gained.

We spent the night with some family in Meridian, ID. You can do the drive in two days, or theoretically one (it is ~22 hours of non-stop driving) but we split it into three days in order to have a bit of a roadtrip.


We fueled up the next morning with some Starbucks. I don't get Starbucks too often, I mean, I come from the Willamette Valley, home of a lot of independent coffee shops, but we go to Starbucks all the time when we travel because it is reliable and ubiquitous.


A lot of people don't get why I like Eastern Oregon and Idaho so much. Dude, look at it! So dramatic and rugged, and I like sagebrush and basalt flows a lot.


We took a detour to Twin Falls, which I am glad we did.


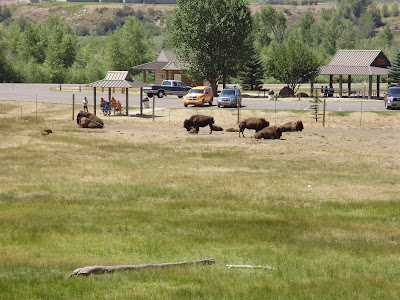
You know you are in Wyoming when there are buffalo heads at the rest stop.


There are a lot of bison around. Incidentally, we eat a lot of bison now that we live here, and it is really good!


Our journey was basically the Oregon Trail in reverse.


Why don't they have covered wagons at Oregon rest stops? They should. ~History~

Anyhoo, so we got to town, and stayed at a hotel the first night. The next day, we drove around town a bit, and hung out in parks and a coffee shop (they do have at least three good coffee shops here! As a definite northwesterner, I approve of this). We ended up driving around some neighborhoods near the university, and saw a for rent sign in the window of one little house. We thought "what the heck" and called the number.

The landlord was actually at the house doing some painting right then, so five minutes later we took a tour, really liked the place, and decided to sign the lease straightaway. This turned out to be a good decision, because ten minutes later, while we were doing the paperwork, someone else who wanted the house gave the landlord a call. 

We stayed with the older couple for a few days while some work was finished up on the apartment, and then moved in shortly thereafter. About two weeks later, though, we still didn't have our furniture and other belongings, just what we'd taken in our car, and it was getting a little ridiculous using three plates and some mason jars for cups.


So, due to a miscommunication about being able to deliver our stuff to Wyoming, we ended up driving a 17 foot truck to Fort Collins (~70 miles away) in order to get our things that were in storage. Not because we needed a truck that big, but because it was the smallest thing any of the Uhaul stores had at fairly short notice.

So I did not enjoy moving our ~2.5 tons of stuff three times (once into the truck, out of the truck into the neighbor's driveway (she gave us permission) because we couldn't get such a big truck any closer to our place, and finally into the house) but we finally got our things, and were able to start getting our house settled.


We did get new Ikea desks though. And you might be able to tell I am a geek, because there is a set of Harry Potter books, and a TARDIS mug on my desk. What self-respecting scientist isn't a geek, though, really?


We did a little hiking at Vedawoo this weekend, which is amazing. 

So, there you have it. We successfully moved and got settled this month. There are still some boxes, but it is mostly our massive collection of books, and buying bookshelves will take care of that.

And I am starting to get the hang of school, I think. The classes aren't too bad, except for Biochemistry, as I was unable to take that at my old school and I don't already have the amino acids and thermodynamics memorized. My research project for my first rotation is really cool though, and I think I am starting to make that transition from undergrad to grad. It is very different then what I am used to.

Friday, August 10, 2012

Packing and moving

We moved from Oregon to Wyoming last week. Moving is never too fun, and I thought I'd had plenty of experience with moves, as I moved 5 times from the start of my Freshman year to the beginning of my Sophomore year, but it turns out that moving several states away is quite a bit worse. Particularly if you are leaving a small town you have lived in for over twenty years.

But Joel (whom I usually call the Man on this blog, if you are confused) and I managed to get it all done pretty well, I think.


Though our apartment got a bit chaotic with all of the boxes and piles.


Luckily we had quite a lot of family members there to help us pack boxes and lift heavy things. Also, my parents were very kind and let us use their driveway as a loading station.


We decided that the best fit for us was to order a pair of Uhaul uboxes, which are sort of like a big crate that you can get shipped to your house, and then Uhaul ships it to your new location, or stores it in a warehouse. Since we did not want to drive a big truck, and since we didn't have a final address yet, these were a perfect solution. 


This is a picture of me in our living room probably two weeks before the move. We'd started packing, but just enough that it made the apartment chaotic.


The living room at the end of the first day of packing. Quite a bit better, but it still looked pretty bad.


And here is the living room after the second day of packing. It looked so much nicer! But also weird, because we'd lived in this apartment for two years, and leaving our old home felt really surreal.


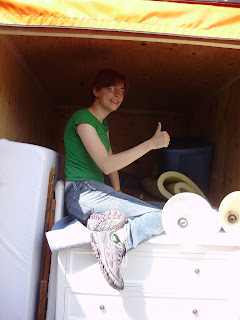
The way the furniture was packed in the Ubox meant that I had to climb onto the furniture in order to fit the rest of the gear. 


This is a picture of one of the fields a few miles from where we lived. We left a valley full of rolling green fields, and have arrived safely to Wyoming, which is also beautiful, but in a more rugged way.

It sort of feels like a chapter of our lived has ended (and like I am speaking in cliches) but I am excited to start my PhD program.

Later, I will post photos of the actually trip to Wyoming.


Sunday, June 10, 2012

Baking Powder Biscuits, gluten-free and vegan


I have been a bit remiss in blogging. It may have something to do with the fact that we have been going places like this:

Crater Lake, which is still very snowy in June. And cold.

Or doing things like this:


Cannon Beach! You can rent a bike and drive on the beach and it is fun! Also, this was the first time I'd been on a bike in years.

...every weekend. The Man and I have been taking a somewhat whirl-wind tour of Things We Love or Have Always Wanted to Do in Oregon Before the Epic Wyoming Move. So of course that means visiting the coast and as many of the national parks as we can get to before moving day arrives.

While eating breakfast on one of these weekend trips, The Man and I both found ourselves lamenting that there isn't much in the way of gluten-free breakfasts to be had at restaurants (he can eat gluten, but often feels sad for me that I can't just order pancakes when we go out). Usually you can have some kind of omelet or potatoes at a restaurant, but we both were thinking how nice it would be to have a good GF biscuit recipe that either of us could just whip up at home.

That got me thinking about weekend breakfasts at my house growing up. My Dad would always (and still does!) make breakfast on Sunday morning. He'd get up at what seemed an early time to me (but I often get up at 5 for my job now, so seven is sleeping in. I must finally be a “real” adult.) and start making eggs and coffee. And there were almost always biscuits. It was a pretty simple recipe, half bisquick, half whole-wheat flour, and all of the add-ins that the bisquick box said to do. I have fond memories of being eight or so, and learning how to shape the biscuits. We don't cut and roll biscuits in my family of origin, you take a wad of dough, roll it into a ball, and stick it on the cookie sheet. They were very, very tasty. In eighth grade, I started making baking powder biscuits from scratch so often that I had the recipe memorized for a while.

Biscuit dough is so simple, surely it must be easy to make gluten-free, I thought. So I took a look in an Amish cookbook I have, and made a couple ingredient swaps to take out dairy and gluten. The result? Tasty, fluffy biscuits that the Man and I happily ate for lunch. They don't quite taste as whole-grain as the biscuits my Dad makes, nor as light as the white-flour ones I used to make, but they are a happy compromise, without the gluten and dairy.

Baking Powder Biscuits
Adapted from “From Amish and Mennonite Kitchens,” by Phyllis Pellman Good and Rachel Thomas Pellman

1 cup coconut or alternate milk of choice
2 tsp lemon juice
2 cups gluten-free flour mix*
2 tsp baking powder
½ tsp xanthan gum
¼ tsp sea salt
3 Tbs Shortening (I used Spectrum)


Preheat oven to 450. Combine the milk with the lemon juice, and set aside for at least five minutes**. Meanwhile, whisk together the dry ingredients. This helps make sure the ingredients are evenly distributed. Add the shortening, and blend with a fork or pastry blender until the mixture becomes fine (1/3 inch or less) crumbs. Add the milk-lemon juice mixture about a quarter cup at a time, stirring the dough after each addition. The dough should be slightly wet, so that it clumps together, but not as wet as muffin batter.

Take about 2 tablespoon of dough at a time, roll into a ball with your hands, and press onto a cookie sheet. Flatten the ball slightly. Do this until you have used up all of the dough. Alternatively, roll out the dough to ½ inch and cut biscuits out.

Bake for 10 to 12 minutes, until lightly browned. Makes about 10 biscuits.

Yaaaaay!


They were a little more crumbly then normal wheat biscuits, but still held up well to normal toppings like jam.

Incidentally, it has been just over one year since I got my gluten-intolerant diagnosis. I thought about doing some kind of big dramatic blog about it, but I haven't the extra time between my job and getting ready to move. I just wanted to make a note of it, and encourage any people who are newly gluten-free. The adjustment does suck a lot at the beginning, but after a year of this diet, I feel so much better, and it is pretty easy and natural to cook for myself. Hurrah for better health!


* My current favorite flour mix is 2 parts sorghum flour : 1 part millet flour : 1 part brown rice. I keep it in a big container. I think this would work well with part oat, or quinoa, or oat flour, but to make biscuits exactly like these, use 1 cup sorghum, ½ cup millet, and ½ cup brown rice flours.

** Adding lemon juice to milk (either an alternate milk or a dairy milk) makes a sort of cheaters buttermilk. Do this anytime you need a non-dairy buttermilk in a recipe, or if you can have dairy, but don't feel like running to the store just for buttermilk.


Sunday, April 1, 2012

Life updates and seasoned fries

Edit: I should clarify that it is a coincidence that I posted this on April Fool's day, when apparently most posts on the Internet are a joke. 

I know that the blog has been rather quiet lately. I mean, a little more than usual. This is largely because of some big decisions/events that happened in the last month. The first, which is fantastic (but not life-altering) is that I have gotten a job. Not only that, but I am thrilled to be doing data entry instead of some kind of cleaning job. I have been grateful for my various housecleaning/janitorial/room attendant jobs in the past, but scrubbing toilets gets a little old. So having this job is great. But between working full time and commuting ~45 minutes each way, I am left with very little time for experimenting with new recipes.

The other big thing from the last four weeks is much more life-altering. I have been accepted into graduate school, which is thrilling and also a little terrifying. Last month, the Man and I visited the school (University of Wyoming), and were impressed by the campus, the research, and the people. It will not be at all like living in the Willamette Valley, but I think we will like it there. Both the trip and making this decision has also contributed to our hectic schedule as of late, though.


The campus is quite pretty.

Being from Oregon, it is weird to see the quad (which they call "the Pasture") covered in snow rather than mud.

Lots of beautiful views around Laramie.


Also: snow. Lots of snow.

So we are eating a lot of simple, quick dinners. That often means a rotisserie chicken from Fred Meyer, salad, and fries.

The Man came up with with method for doing fries, and it is brilliant. Normally I dislike oven fries, but these are fantastic, and we eat them at least once a week.

Begin by purchasing a bag of frozen shoestring fries. Any brand of frozen fries is fine, but I think this works the best with the shoestring cut.

Preheat the oven to 425 F. Line a baking sheet with tinfoil if you want to have less cleanup work.

Pour out as many fries as you intend to eat onto the baking sheet. This was maybe a quarter of the bag. Drizzle 2-3 tablespoons of olive oil onto the pile of fries. Season to taste; for the amount of fries the two of us eat, I use a pinch of sea salt, a pinch of black pepper, and about a half teaspoon of Italian seasoning (I highly recommend the McCormick Grinder italian seasoning, we use it on everything).

Toss the fries until the oil and spices coat them evenly. Spread the fries out into as even a layer as possible.

Bake for 7 minutes. Remove the fries, and add more seasoning if desired. I usually do up to a teaspoon total of Italian seasoning. Toss the fries again, and bake for 6-8 more minutes, until the fries have some nice golden brown edges. It is very easy to over or undercook the fries, so keep a close eye on them towards the end.

And there you have it! An easy, really tasty, and not too-unhealthy side dish for a quick meal. Also: naturally dairy-free and gluten-free.


Fries right out of the bag.


After tossing them in oil and seasoning.


The baked fries, with my dinner.

Sunday, February 12, 2012

Molten Chocolate Lava Cake, Gluten Free

You can see here why it is called "molten" and "lava" since a little batter spills out of the finished cake.

We don't typically do a lot to celebrate Valentine's Day at my household. It can be a fun holiday, if you are seeing someone; but it can be painful if you are single, or a hassle if you're not, or both either way. I suppose it just seems strange when a holiday insists that you must be romantic in a certain way on a certain day, especially a holiday named for a Roman martyr. Valentine's Day is nice excuse for chocolate and a date night, though.

Which was part of the inspiration for making a gluten-free chocolate lava cake. I keep seeing glutenous chocolate recipes everywhere on the Internet because it is February. I used to make this recipe a fair bit, because it is quick, easy, and delicious, yet seems quite fancy. So I adapted it to be gluten-free. It can also be made totally dairy-free if you use coconut oil instead of butter. Both are delicious.

This is a pretty fantastic dessert, and just in time for Valentine's Day, whether you celebrate it or not!

Molten Chocolate Lava Cake, Gluten Free

Adapted from Brandielle's recipe

Also, the Pioneer Woman made the original recipe with a bunch of step-by-step photos a few years ago, if you are so inclined.

Serves 2 (can easily double or triple)

4 ounces dark chocolate
¼ cup butter or coconut oil (½ a stick)
½ cup powdered sugar
½ cup gf flour, such as sorghum
2 eggs
1 tsp vanilla

Preheat oven to 425 F.

Melt the chocolate and butter together by microwaving in a microwave-safe bowl in 20 second increments. Stir between microwaving, until the contents of the bowl are completely melted. Allow the mixture to cool for 3-5 minutes.

Add the sugar, flour, eggs, and vanilla, and whisk until the mixture is smooth. Spoon the batter into two well-greased ramekins. Bake for 13-14 minutes, or until soft in the middle, but not liquid.

Remove the ramekins from the oven, and let cool for a few minutes. Invert the ramekins onto a plate. The cake should have a bit of gooey batter in the middle, hence the “molten” and “lava” in the title. Eat and enjoy!


Stirring the melted chocolate and butter/coconut oil

Stirring in the flour, sugar, vanilla, and eggs. It is important to let the chocolate cool off a bit before adding in the eggs, so that they don't congeal or cook.

The batter prior to baking.

After baking.

Inverted.

Delicious chocolate middle! It is like having chocolate sauce on your cake, but without the extra work.

Sunday, January 29, 2012

Delicious Chocolate and Blood Orange Cupcakes

(Which I was going to call “Gluten-free vegan chocolate cupcakes with a customization option which I made with blood oranges” but I realized that this was a rather long-winded way of titling something which, quite simply, was delicious).


These pictures are not the greatest; I was in a hurry to finish baking before a meeting.

A lot of people in my life have food allergies/intolerances now, and so it is pretty common to have long email threads before a gathering to see who can eat what, and what people should bring that everyone can eat. This is very confusing for folks who do not live with these dietary issues, particularly when it comes to baking. So, usually I am asked to handle the desert. Which I am happy to do!

Most recently, we needed to accommodate egg, dairy, and gluten issues, so the brownies that I normally make were out. I had made these mocha cupcakes before, and they were delicious, but there were young kids at the gathering, and I didn't think their parents would appreciate a caffeine-laden desert. But I liked the idea of cupcakes (according to The Internet, cupcakes are a culinary trend that is becoming unfashionable) (I think that is ridiculous, cupcakes have always been a mainstay of birthday parties and gatherings where a layer cake is impractical) (plus they are super-kid friendly and seem to make a bit less of a mess) (good heavens this is a lot of parentheticals) so I tweaked the already-fabulous recipe into something that would work for me.

And thus we have this recipe for a plain chocolate cupcake, which is also vegan and gluten-free.

Chocolate cupcakes

Adapted from the Gluten-Free Goddess

Dry ingredients

¾ cup sorghum or brown rice flour
¾ cup cornstarch
½ cup cocoa powder
1 cup granulated sugar
½ rounded tsp sea salt
1 tsp baking soda
1 tsp baking powder
1 tsp xanthan gum

Other ingredients
2 Tbs ground flax seed + 4 Tbs warm water (you can use 2 eggs instead if you prefer)
1 cup non-dairy milk of choice
3 Tbs light-tasting oil
½ tsp vinegar
1 tsp vanilla extract

Preheat oven to 350 F.

Combine the flax with the warm water in a small bowl, and set aside, allowing it to sit for at least five minutes. This is your “egg.”

Combine the dry ingredients in a medium sized bowl, and whisk together to incorporate.

Add in the other ingredients, including the flax “egg,” and mix for 2-3 minutes. This can be done in a stand mixer or with a regular spoon or whisk if you don't mind a work-out. The batter will be very thick, and somewhat stringy.

Fill muffin tins (lined with cupcake liners) about 2/3 full of batter. It may be necessary to smooth out the tops of each tin of batter with the back of a spoon in order to get a smooth top after baking.

Bake cupcakes for 20 minutes.

Makes 1 dozen cupcakes.

Remove from the tin to a wire rack to cool, or else the cupcakes become slightly soggy.

Wait until the cupcakes have completely cooled prior to frosting.

Frosting:

2 cups powdered sugar
2-4 Tbs shortening (I used Spectrum)
¼ cup cocoa powder
1 tsp vanilla extract
2-3 Tbs non-dairy milk

Combine the first four ingredients, then add “milk” one tablespoon at a time. Blend with a stand or hand mixer until fluffy. Add more liquid if necessary. Pipe or spread onto cooled cupcakes.

Unfrosted chocolate cupcakes. Gluten-free baked goods are often a little lumpy if you don't smooth out the batter.

Variation:

After making these, I decided to try to make another variety. I suspect you could make infinite variations to this recipe if you so desired. Basically, you change what spices or extracts you add to the batter, replace cocoa powder with cornstarch if the cupcake is non-chocolate, and use different liquids for the “milk.” I made a blood orange cupcake, and it was fantastic. I used these ingredients, following the instructions above. Please experiment with making your own changes to the recipe, until you find something that you really like! The recipe seems to be pretty forgiving.

Blood orange cupcake variation

Dry ingredients

¾ cup sorghum flour
1 ¼ cup cornstarch
1 cup sugar
½ rounded tsp sea salt
1 tsp baking soda
1 tsp baking powder
1 tsp xanthan gum
half the zest of a blood orange
½ tsp nutmeg

2 Tbs flax + 4 Tbs warm water
3 Tbs oil
½ cup blood orange juice
½ cup coconut milk
2 tsp lemon juice

Frosting:

2 cups powdered sugar
2-4 Tbs shortening
half the zest of a blood orange
~2 Tbs blood orange juice


Unfrosted cupcakes. These were pretty tasty plain.

Pretty pink frosting.


So try either variation, or play with the ingredients and make your own! Cupcakes should be fun as well as tasty.


Sunday, January 15, 2012

A Gluten-Free Twist on Eggs Benedict


One thing I miss quite a bit since going gluten-free is Eggs Benedict. It is a delicious dish, but in my mind it is dependent on having a perfect English muffin. I have not found a DF/GF English muffin yet that works for me, and I haven't gotten around to making my own yet. I am still working on a bread replacement that tastes like real bread (my recipe on this site is tasty enough, and good for putting sandwich fillings on, but the texture is all wrong when I crave real bread) after all. So I decided to put together a deconstructed Eggs Benedict since I had Canadian bacon in the fridge. Then I thought I'd add salsa and avocado. I needed some carbohydrate to hold it all together, so I made brown rice.

The result was more of a Southwestern-inspired meal, and is nothing like Eggs Benedict aside from the egg and canadian bacon, but it was good.

To make your own, first start cooking some brown rice. When it is done, fry a slice or two of canadian bacon. Meanwhile, spoon some rice onto a plate. When the bacon is done, place it on top of the rice. Fry or poach an egg until it is soft in the middle. Or until runny, if that is what you prefer. Slide the egg onto the bacon, and spoon salsa over the whole thing. Add avocado slices if desired. Hollendaise sauce would be awesome, but I didn't want to get that many dishes dirty. Put some salad greens on your plate if you are trying to eat better.

Result: tasty, and naturally gluten and dairy free.