Saturday, November 14, 2015

Smitten Kitchen's Warm Potato Salad

The sun is setting at 5 PM now, so getting photos of my dinner that look nice is hard!

When I first saw Smitten Kitchen's recipe for potatoes with soft eggs and bacon vinaigrette, I knew I had to make it immediately, as it was a perfect combination of things that I love (potatoes! bacon! vinaigrette! soft eggs! some greens to make it healthy!) I made it for dinner the next night even though I didn't have all of the right ingredients on hand, and it is such a well-written formula that tweaking it to use slightly different ingredients still yields a delicious warm potato salad.

So! I have made this half a dozen times since Deb posted the recipe, and have figured out that I prefer this meal with poached rather than soft-boiled eggs (I find peeling soft eggs without crushing them to be rather difficult, alas), that it works better with greasier bacon so that there is sufficient bacon grease for the vinaigrette, that it is just fine without blue cheese, and that boxed salad greens work very well when your local grocery doesn't stock frisee.

Though I tend to make a couple ingredient changes from the original, I am just posting this as a recommended recipe, rather than posting a recipe here, because Deb's recipes are always so beautifully done and well-tested. You should make this, it is delicious and gluten-free, and by skipping the cheese it is dairy-free too!

Saturday, August 29, 2015

Gluten free chocolate cake

Chocolate cake, ganache, whipped cream, and peaches!

 Here is a recipe for a gluten free chocolate cake that is delicious and moist and doesn’t dry out for a few days!


My spouse’s grandmother has been gluten-free for a couple years now, and one of the tips she gave me recently was to use Bob’s Red Mill’s 1 for 1 Gluten Free flour blend. I have used their other all-purpose GF mix in the past and didn’t like it as much, possibly because of the use of bean flour, but the 1 for 1 mix is made of different flours.


This is not a paid advertisement for Bob's Red Mill, nor do they know who I am (though Bob Moore did get his seminary degree through my Alma Mater!) I just love their products.

The idea behind 1 for 1 is that you can adapt a normal (gluten-containing) recipe to be gluten free, just by using this mix instead of wheat flour, and it should turn out well. It is the same idea as the Better Batter and Cup for Cup mixes, but I have not ever used those blends, so I can’t attest to how good those are.

This recipe is nearly identical to Pioneer Woman’s recipe for strawberry Nutella cake . The differences are the use of a gluten-free flour blend, that this recipe only makes one layer of cake instead of two, and I added an extra egg which helps keep the cake from crumbling.


Gluten free chocolate cake

Adapted from Pioneer Woman

Ingredients

1 stick of butter (8 tablespoons)
2 heaping tablespoons cocoa powder
½ cup boiling water
1 cup gluten-free flour mix (Bob’s Red Mill 1 for 1 flour blend is what I have tested this recipe with)
1 cup granulated sugar
A pinch of salt
¼ cup buttermilk
2 eggs
½ teaspoon baking soda

½ teaspoon vanilla extract or spiced rum

Makes one layer. For a double-layer cake, double all ingredients and use two cake pans.


Preheat oven to 350 F. Grease a round 9” cake pan, and line the bottom of the pan with parchment paper that is lightly greased (The first time I made this recipe the cake fell apart but when I made it again with the parchment paper it helped prevent this).

Parchment paper is really helpful for preventing GF baked goods from sticking 

Melt the butter in a saucepan over low heat. Once melted, add the cocoa powder and stir until smooth. Add the boiling water and stir again. Turn off the heat and set the cocoa mix aside.


Here is the melted butter, cocoa powder, and boiling water all mixed together

Mix the buttermilk, baking soda, eggs, and vanilla or rum together in a small bowl or mixing cup (I ran out of vanilla extract and used some amber rum that I had on hand and it added a nice flavor to the cake. Use what flavoring you prefer).  Set aside.


Buttermilk, baking soda, eggs, flavoring mixed together

Mix the sugar, GF flour, and salt together in a large bowl. 

The dry ingredients whisked together

Slowly add the cocoa mixture to the flour mixture and stir until smooth.

At the beginning of mixing... 

And after mixing a while the batter turns to a dough-like consistency

Pour in the buttermilk mixture and mix until all ingredients are well incorporated.

Buttermilk mixture just added

 Batter after everything has been well mixed

Pour the batter into the greased cake pan, and then bake for 17-27 minutes (I live at 7200 feet and needed 26 minutes) testing for doneness

Before baking

Let the cake cool in the pan for about 5 minutes before sliding a butter knife around the edges of the cake, and then carefully turn the cake onto a wire rack to cool completely before proceeding to decorating the cake.

After baking. You can see marks where I stuck a fork in to test if it had baked long enough

The pan is probably too hot to touch at this point, so use hot pads to flip the cake, or wait until the pan is cool enough to touch safely. I like to put the cake rack upside down on top of the pan, and then carefully invert the two together. Tough to describe and tougher to photograph by yourself!


Don't forget to remove the parchment paper

Now decorate the cake however you like! Use Nutella like in Pioneer Woman's recipe, or buttercream frosting, or with a layer of ganache, then whipped cream, then fruit as in my pictures. I have made this twice with a layer of ganache and then a thick layer of whipped cream. I have made it with both chopped peaches macerated in a little sugar (shown below), and with sliced strawberries and pitted cherries (last picture). Use any fruit that sounds good!

With peaches

~artsy photo~ with strawberries and cherries!

*allergy note: this cake could be made dairy free by swapping butter for margarine, and the buttermilk for soy or almond milk with a teaspoon of lemon juice added a few minutes before mixing it with the other ingredients.

Thursday, August 21, 2014

Coconut Macaroons

I had a bag of unsweetened coconut lurking in the back of my cupboard, and in the spirit of trying to use up ingredients but also wanting something really simple to bake because I cannot deal with recipes that use up dozens of dishes these days, I made some macaroons. I was surprised by how much I liked them; they are slightly crisp on the outside and pleasantly chewy inside.

Macaroons: very simple to make, and gluten-free/dairy-free without adaptation.


Macaroons (with unsweetened coconut)

Adapted from this recipe

As always, if you need to be gluten-free, make sure to check your ingredient labels before baking.

3 egg whites
2 cups finely shredded unsweetened coconut
½ cup plus 1 TBS granulated sugar
1 tsp vanilla extract
¼ tsp sea salt (optional)

Yields about 12 cookies.

Preheat oven to 350 F.

Mix all the ingredients together, until all the coconut is incorporated and the dough is slightly sticky (you may need to use a little more or less coconut depending on how big your egg whites are).

Cover a baking sheet with parchment paper (or use a lot of cooking spray instead of the paper, but I like parchment paper because it makes clean up really easy). Using your hands or a spoon, form the dough into walnut-sized balls and place on the baking sheet. Flatten them slightly.

Bake at 350 F for 16-20 minutes, until the macaroons are slightly brown (I live at 7000+ feet, you may need to adjust your cooking time. 18 minutes was perfect for these cookies at my altitude).


 Mixing all the ingredients together.

It will take a few minutes of stirring, but eventually all the ingredients will come together to form a dough. 

Unbaked macaroons. 

Baked macaroons! You can see that I had a small ring of caramelized sugar/egg white around the macaroons. I think this could be prevented by adding a little more coconut and/or by putting the cookies on the middle over rack; I forgot to rearrange my oven racks and used the bottom one.

Friday, January 10, 2014

Sweet potato and black bean enchilladas

Good heavens, I haven't posted since May! Last time I mentioned that I hadn't officially made it into my graduate program yet (most molecular biology PhDprograms have you do rotations in 3+ labs, then you choose the lab you want to spend the next few years of your life in. Some programs, including mine, also have a written exam at the end of the first year, which is important to pass before you are officially accepted) but shortly after the last post it became official.

 So I have been in a lab for the last 6ish months, working on my dissertation research, which is awesome! But though things have slowed down from my first year (I often only work 60 hours a week now! You may roll your eyes at the "only" but I was doing 12 credits of grad work last spring, and studying takes a while)  grad school is really quite time consuming. And I try to find time for my spouse, and occasionally to be social, and to go to the gym every now and again, so I don't exactly spend the kind of time on fun baking as I did when I was unemployed in 2011. But the Man and I try to trade off who makes dinner each night, so I am still doing a decent bit of cooking, it just isn't always very creative.

However, these enchiladas are really quite low-effort for how good they taste, and they are quite healthy as well. I have made these enchiladas several times now, including for vegetarian guests one time, and they liked them quite a bit. This is very much inspired by a sweet potato burrito served at the vegetarian restaurant in town (called Sweet Melissa's, I highly recommend it if you are ever in Southeastern Wyoming) which is amazing, but sometimes I am just too tired to go out when I want enchiladas. So this is how I make them! They are vegetarian (except that I use a bit of chicken broth when it is just us omnivores [that is what I always have open in the fridge] but you can use vegetable broth or water) and pretty easy to make vegan/dairy-free, just skip the cheese!


Sweet potato and black bean enchiladas

serves about 3

1 roasted medium sweet potato
16 oz can of black beans, rinsed and drained
salt and pepper to taste
2 tablespoons gluten-free broth (I used chicken, but use vegetable to make it vegan/vegetarian) or water, optional
Gluten-free tortillas (I use the small corn tortillas from Mission)
shredded cheese, optional
16-24 oz jar of salsa verde, mild or medium
1/4 avocado, optional

Preheat oven to 400 F. line a pan with foil, and place your sweet potato in the pan. Roast until the sweet potato is soft, about an hour if it is medium sized, an hour and twenty minutes if it is big. (I like to roast several at a time and use them in recipes later in the week, cooked sweet potatoes seem to keep for a while. There are 3 in the picture but I just used 1).


Let the sweet potato cool until it is safe to handle. I like to stick sweet potatoes in the fridge. After it has cooled sufficiently, cut it in half, and then peel the skin off. At this point, if you turned off the oven (which I did, having roasted these the day before) begin preheating it to 400 F.


The skin should pull off pretty easily if the sweet potato is cooled enough, but you can use a knife to cut off any stubborn bits.


Cut the sweet potato into small cubes. It should be pretty soft, but doesn't need to be completely squishy, just make sure the middle isn't crunchy. If it is, you can cook it in the oven longer, or microwave the uncooked parts for a minute or two.


Put the cut sweet potato into a bowl, and add the rinsed black beans to the bowl. Season with salt and pepper, or other seasonings if you'd like. I add two tablespoons of broth at this point, it adds a bit more flavor, and some moisture that lets the filling stick together better, but you can skip it or use water or vegetable broth to keep it vegetarian. 


Stir everything together until the ingredients are evenly distributed.


Now you can start filling the tortillas. The little corn tortillas crack easily, so be careful when handling them. Lay out a couple tortillas in a baking dish, preferably one that is lined with foil and well-oiled. Scoop a couple spoonfuls of the sweet potato and black bean filling onto the tortillas.


I added some cheese (I can tolerate dairy quite well now! After my roughly 18 month hiatus from all dairy products except butter) but the meal is still delicious without any cheese if you don't do dairy.


Fold over each tortilla as shown below. The corn tortillas like to split apart at this stage, so be careful when folding them.


Now flip the rolled enchilada over so that the seam side is facing down.


Like so! Repeat with your other tortillas. 


Fill all the other tortillas and flip them over until you A. have decided you have enough enchiladas, B. Run out of room in the baking dish or C. have used up all of your filling.

Pour a jar of salsa verde over the enchiladas so that they are all covered in sauce. I did not take a picture because there is no way to make a pan of salsa verde look appetizing under fluorescent lighting at night. This is a 24 ounce jar, but I think you could get by with only 16 ounces if you don't like really saucy enchiladas.


I added some cheddar and mozzarella cheese. Again, this isn't necessary if you don't do dairy, but it is tasty. I find that serving Mexican-inspired food with avocado or guacamole instead of cheese is a very good substitution.


Bake at 400 F for 20-25 minutes.


I like to serve these with avocado, but skip it if you are not so inclined.


And that's it! These are easy and tasty, and pretty quick if you roast the sweet potato ahead of time. 

Sunday, May 5, 2013

Olive focaccia from gluten-free pizza crust mix


I have been absent from this blog for an entire school year. I had intended to write a post over Christmas break, but then my computer broke and I didn't get it back from the repair place until well after classes had started back up (which was stressful when trying to write a presentation). As it turns out, grad school is hard, and it takes enough time as it is just trying to make nutritious food, let alone blogging about it. Classes are done for the year, though! I just need to get through a final and a qualifying exam, then I will officially be in the program and on my way to getting my PhD. I am excited while also being mildly terrified.

Most weeks there hasn't been a lot of time for baking, and certainly not much time for tinkering with new techniques and recipes. I have looked at this recipe by the Gluten Free Goddess with the intent to make it, but I haven't yet just because of time. Inspired by how delicious it looks, I saw that I had a bunch of pizza crust mixes in my cupboard and decided to experiment. I am very happy with this olive focaccia recipe, both because it is absurdly delicious, and because it is so very easy! I made this in 1.5 hours, and about 1.25 of that was rising and baking. That fits into my (incredibly busy) schedule quite nicely. (No, seriously, some well-meaning ladies at church were telling me that I am just finding excuses to get stressed, and I responded with how excited I am to join my thesis lab, because for most of the summer I will only be working 60 hours a week thanks to no classes and it will be relaxing. They were like "...oh.")

The trick to this is that I used Bob's Red Mill gluten-free pizza crust mix, which makes really good focaccia-style bread, as it turns out. And I accidentally bought four of the crust mixes for about 3 dollars a piece (long story) on Amazon the other day, so this was quite a bit cheaper then some of the 6 dollar GF bread mixes I've used.


 So here is how to make it:

Olive Focaccia from GF pizza crust mix.

Ingredients:

1 package Bob's Red Mill pizza crust mix (you could probably use another brand, but I wouldn't know what is good)
1.5 cups warm water
2 eggs
2 Tbs olive oil, plus more for the pan and the loaf.
30 or so of your favorite olives (pitted!)
Sea salt to taste
Rosmary or other herbs to taste

Mix the warm water (110 F) with the yeast packet from the mix in a large bowl. Let the mixture sit for five minutes, this is "proofing" the yeast.

Add eggs and 2 Tbs of oil, and whisk together. Add the contents of the pizza mix and stir until the dough is well-mixed.

Let the dough rise for 20-30 minutes.

Preheat oven to 400 F.

Oil a 9 inch round cake pan well with olive oil. Transfer the dough from the bowl to the pan, then pour another tablespoon or two of olive oil over the top of the dough, which is both delicious and will also help you during the next step.

Smooth the surface of the dough with your hands so that there is a fairly level surface. The olive oil helps keep your hands from sticking.

Make sure that your olives are fairly well-drained before proceeding.

Push pitted olives into the surface of the dough, making sure they are well-buried, but the tops are still visible. I used a mix of smoked green olives and kalamata olives. Be sure to space the olives apart fairly well.

Sprinkle the top with sea salt. Rosemary or Italian seasoning would have been excellent, but I didn't think of it in time.

Allow the bread to rise for another 10-20 minutes while the oven is heating.

Bake the bread for 25-35 minutes (I only needed 30, but I am baking at 7200 feet and you may need more or less time). The surface of the bread should be lightly brown, and if a fork or toothpick is inserted into the bread, it should come out clean.

Let the bread cool for 20 minutes or so, then slice and enjoy!


If you can't have one of the ingredients in the mix, or don't want to buy a mix, then check out the Gluten-Free Goddess's recipe. I have not made it yet, but it was the inspiration for this!

Sunday, September 16, 2012

Adventures in moving.

So life has been a bit busy. We successfully made the move to Wyoming, despite not knowing where we would be living when we got there. A nice couple in town had us stay in their spare room for a couple days, but there was some stress about this, as none of the rental agencies we'd looked at had a move-in date before the 15th of August. Since we got to town on the 5th, this was worrisome. And there weren't a lot of apartments left, as school began on the 27th, and many students had already moved to town. But we made the move anyway, hoping the apartment situation would work out.


We drove through Portland one last time. This picture was the reason we missed our exit; I was too busy taking the photo, and forgot to point out exit 300 (which is the only exit in Portland that I definitely know how to get to, as it is the exit to OMSI where I volunteered for a while this year). We sorted out the debacle, and eventually got to I-84, with only an extra 20 minutes added to the trip. 


Starvation Creek in the Columbia Gorge. It is very pretty, and makes a nice rest stop.


I really liked the root structures.


Somewhere around here, used to be Celilo falls. This and other important fishing sites used by Oregon and Washington tribes were submerged in the 50's by the dams being built at the time, which had been a center of trading to these tribes for thousands of years. Which, well, is depressing, but I think it is important to remember what was lost when things like hydroelectric power from the dams were gained.

We spent the night with some family in Meridian, ID. You can do the drive in two days, or theoretically one (it is ~22 hours of non-stop driving) but we split it into three days in order to have a bit of a roadtrip.


We fueled up the next morning with some Starbucks. I don't get Starbucks too often, I mean, I come from the Willamette Valley, home of a lot of independent coffee shops, but we go to Starbucks all the time when we travel because it is reliable and ubiquitous.


A lot of people don't get why I like Eastern Oregon and Idaho so much. Dude, look at it! So dramatic and rugged, and I like sagebrush and basalt flows a lot.


We took a detour to Twin Falls, which I am glad we did.


You know you are in Wyoming when there are buffalo heads at the rest stop.


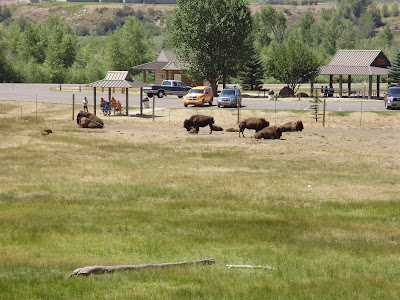
There are a lot of bison around. Incidentally, we eat a lot of bison now that we live here, and it is really good!


Our journey was basically the Oregon Trail in reverse.


Why don't they have covered wagons at Oregon rest stops? They should. ~History~

Anyhoo, so we got to town, and stayed at a hotel the first night. The next day, we drove around town a bit, and hung out in parks and a coffee shop (they do have at least three good coffee shops here! As a definite northwesterner, I approve of this). We ended up driving around some neighborhoods near the university, and saw a for rent sign in the window of one little house. We thought "what the heck" and called the number.

The landlord was actually at the house doing some painting right then, so five minutes later we took a tour, really liked the place, and decided to sign the lease straightaway. This turned out to be a good decision, because ten minutes later, while we were doing the paperwork, someone else who wanted the house gave the landlord a call. 

We stayed with the older couple for a few days while some work was finished up on the apartment, and then moved in shortly thereafter. About two weeks later, though, we still didn't have our furniture and other belongings, just what we'd taken in our car, and it was getting a little ridiculous using three plates and some mason jars for cups.


So, due to a miscommunication about being able to deliver our stuff to Wyoming, we ended up driving a 17 foot truck to Fort Collins (~70 miles away) in order to get our things that were in storage. Not because we needed a truck that big, but because it was the smallest thing any of the Uhaul stores had at fairly short notice.

So I did not enjoy moving our ~2.5 tons of stuff three times (once into the truck, out of the truck into the neighbor's driveway (she gave us permission) because we couldn't get such a big truck any closer to our place, and finally into the house) but we finally got our things, and were able to start getting our house settled.


We did get new Ikea desks though. And you might be able to tell I am a geek, because there is a set of Harry Potter books, and a TARDIS mug on my desk. What self-respecting scientist isn't a geek, though, really?


We did a little hiking at Vedawoo this weekend, which is amazing. 

So, there you have it. We successfully moved and got settled this month. There are still some boxes, but it is mostly our massive collection of books, and buying bookshelves will take care of that.

And I am starting to get the hang of school, I think. The classes aren't too bad, except for Biochemistry, as I was unable to take that at my old school and I don't already have the amino acids and thermodynamics memorized. My research project for my first rotation is really cool though, and I think I am starting to make that transition from undergrad to grad. It is very different then what I am used to.